Configuring the Raspberry Pi
Setting up the Raspberry Pi with the requisite software is a complicated process. At some point, I hope to put together a tutorial detailing all of the steps. However, the simplest solution for now is to supply complete Pi images that you can write to an SD card of your choice. I have three possible images to choose from, depending on your choice of Raspberry Pi and how you want the WiFi configured.
Regardless of which image you choose, you will need an 8 GB micro SD card. A class 10 card is preferred, but I have used class 6 cards also and they do not seem to significantly affect the performance. Once you have downloaded the system image of choice, you will need to write that image to your SD card. The tool that I use to do that is Win32DiskImager.
The following details the two possible options.
Raspberry Pi configured as a WiFi access point.
This is probably the simplest option, but it will not work with the older Pi Zero, only the Pi Zero W. The system image that sets it up as a WiFi access point and you can find that image here.
Once you have created the SD card, insert it into your Pi and boot it up. Once running, a WiFi hotspot named Robot should appear.
Raspberry Pi which connects to existing network.
This image is configured so that your Pi will connect to an existing network and will work for both the Pi Zero, Pi Zero W and Pi 3. This image can be found here.
If you name your router’s hotspot robotics, set the password the raspberry and set the IP range to 192.168.1.xx, then this image should automatically connect and the robot’s IP will be 192.168.1.50.
If you want to connect to a different network of your choice, you will need to configure it. If you are using a Pi 3 (or have access to one) this is a fairly simple process. If all you have is a Pi Zero then you may need to add a USB hub so that you can connect a mouse and keyboard.
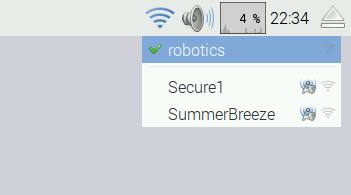
The easiest way to configure this is to boot up the Pi and then type ‘startx‘ at the command line. This will start the GUI. Then click on the network icon in the upper right and select your desired network:
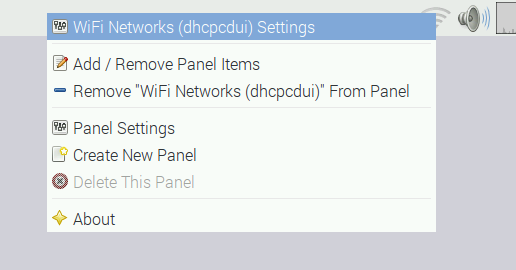
I strongly recommend that you configure your Robot with a fixed IP rather than letting the WiFi router assign one. That way you will know the IP of your robot (which you will need later) and not have to go hunting for it. To set the IP, right click on the same icon and select the WiFi Networks (hdcpcdui) Settings option
You should see the following dialog:
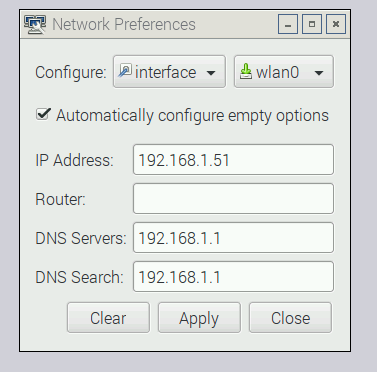
Enter the IP you wish to use. You should choose an IP which is part of the subnet for your router, but not one of the values that the router automatically assigns. The values for the DSN Servers annd DNS Search are not important because we will not be connecting this Pi to the internet. You can leave them blank or fill them in with the servers provided by your router.
If you don’t have a Pi 3 or USB hub for your Pi Zero, then it is a little bit more complicated. Since on a Pi Zero you only have one USB connection you are not going to be able to configure the WiFi by using the GUI interface.
Instead, connect a keyboard to the USB port, and monitor to the HDMI output. Then boot your Pi.
First you must configure your Pi to connect to your network. The WiFi configurations are stored in the file /etc/wpa_supplicant.conf. If you edit that file you will see:
ctrl_interface=DIR=/var/run/wpa_supplicant GROUP=netdev
update_config=1
country=GB

network={
	ssid="robotics"
	key_mgmt=NONE
}
This will cause the Pi to connect to an unsecured network named robotics. If you want to connect to a secure network you are going to need something like:
network={
	ssid="robotics"
	psk="MyPassword"
	key_mgmt=WPA-PSK
}
To set the fixed IP for your Pi, you must change /etc/dhcpcd.conf. If you edit this file you will see:
# A sample configuration for dhcpcd.
# See dhcpcd.conf(5) for details.

# Allow users of this group to interact with dhcpcd via the control socket.
#controlgroup wheel

# Inform the DHCP server of our hostname for DDNS.
hostname

# Use the hardware address of the interface for the Client ID.
clientid
# or
# Use the same DUID + IAID as set in DHCPv6 for DHCPv4 ClientID as per RFC4361.
#duid

# Persist interface configuration when dhcpcd exits.
persistent

# Rapid commit support.
# Safe to enable by default because it requires the equivalent option set
# on the server to actually work.
option rapid_commit

# A list of options to request from the DHCP server.
option domain_name_servers, domain_name, domain_search, host_name
option classless_static_routes
# Most distributions have NTP support.
option ntp_servers
# Respect the network MTU.
# Some interface drivers reset when changing the MTU so disabled by default.
#option interface_mtu

# A ServerID is required by RFC2131.
require dhcp_server_identifier

# Generate Stable Private IPv6 Addresses instead of hardware based ones
slaac private

# A hook script is provided to lookup the hostname if not set by the DHCP
# server, but it should not be run by default.
nohook lookup-hostname

interface wlan0
static ip_address=192.168.1.51
static routers=
static domain_name_servers=192.168.1.1
static domain_search=192.168.1.1
You need to change the lines at the bottom to reflect your network.
Note that both of these images have the Remote Desktop client installed. So if you able to get it to connect to your network, you should be able to use Windows’ Remote Desktop to launch the Pi’s desktop. This would allow you to configure the Pi without having a monitor available.