So far we have been controlling the motors by setting their power. Unfortunately, this is not ideal because the power only indirectly controls the speed, which is what we are really interested in. As we have already seen, our robot does not exactly drive straight when we apply the same power to both wheels. This is because differences in the motors and the way they are mounted cause them to run at slightly different speeds when the same power is applied.
What we need is some way to tell how far the wheels have turned and how fast. Each of the wheels on this robot have an encoder which will do just that. We will use the encoder to control the distance the robot moves as well as it’s speed.
For our first exercise, we are going to create a new command, similar to our DriveForTimeCommand, that will drive the robot forward a fixed distance, rather than a fixed time. Before that, a word on encoders and how we use them in software.
The encoders that we are using are handled by the Encoder class. We will need to create a separate instance of this class for the left and right motors. The DriveSubsystem will eventually need the encoders so we will be adding these to that class. Consulting the Encoder class documentation, we see that the constructor take a encoder type and two integer parameters which specifies the Arduino pins to which they are connected. For this robot the encoder type is Quadrature. The left encoder is connected to pins Q1_INT and Q1_DIR, while the right encoder is connected to pins Q2_INT and Q2_DIR. Open the DriveSubsystem.java file and add the following at top of the class.
|
1 2 3 4 5 6 7 8 9 10 11 12 13 14 15 16 17 18 19 20 21 22 23 |
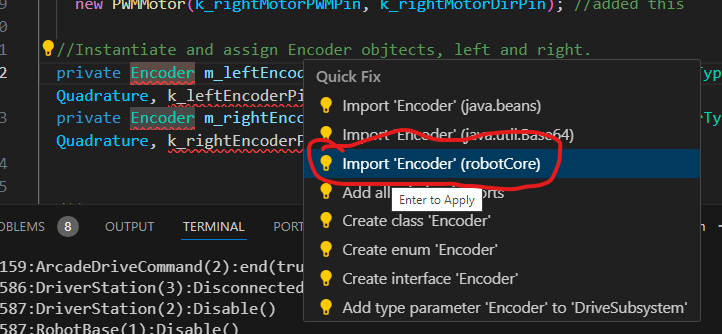
public class DriveSubsystem extends SubsystemBase { //Define motor constructor arguments before Constructor calls private static final int k_leftMotorPWMPin = Device.M1_2_PWM; private static final int k_leftMotorDirPin = Device.M1_2_DIR; private static final int k_rightMotorPWMPin = Device.M1_1_PWM; private static final int k_rightMotorDirPin = Device.M1_1_DIR; //Define encoder constructor arguments before Constructor calls private static final int k_leftEncoderPin1 = Device.Q1_INT; private static final int k_leftEncoderPin2 = Device.Q1_DIR; private static final int k_rightEncoderPin1 = Device.Q2_INT; private static final int k_rightEncoderPin2 = Device.Q2_DIR; // Define motor variables //and Instantiate and assign PWMMotor objects, left and right private PWMMotor m_leftMotor = new PWMMotor(k_leftMotorPWMPin, k_leftMotorDirPin); private PWMMotor m_rightMotor = new PWMMotor(k_rightMotorPWMPin, k_rightMotorDirPin); //Instantiate and assign Encoder objtects, left and right. private Encoder m_leftEncoder = new Encoder(robotCore.Encoder.EncoderType.Quadrature, k_leftEncoderPin1, k_leftEncoderPin2); private Encoder m_rightEncoder = new Encoder(robotCore.Encoder.EncoderType.Quadrature, k_rightEncoderPin1, k_rightEncoderPin2); |
When you import the Encoder class be sure to select the one from RobotCore.
Also note that once again we are declaring constants for the encoder pins rather than simply using the numbers directly in the call to the constructor.
The way the encoders are wired, the left encoder works as expected – when the left wheel moves forward (e.g., moves the robot forward), the encoder counts up. BUT, the right encoder counts down when the wheel moves forward. Rather than having to deal with this throughout the code, we can tell the encoder that it is “inverted” by adding the following to the DriveSubsystem constructor:
|
1 2 3 4 5 |
public DriveSubsystem() { Logger.log("DriveSubsystem", 3, "DriveSubsystem()"); m_rightEncoder.setInverted(true); } |
The call to setInverted(true) tells the encoder to report the reverse of its direction, so it becomes “positive means forward”, like the left encoder.
Now we need access to these encoders from our Command classes, so we will create functions to retrieve the left and right encoders. Add these to DriveSubsystem above the periodic() method.
|
1 2 3 4 5 6 7 8 9 |
//Return the left encoder value public Encoder getLeftEncoder() { return (m_leftEncoder); } //Return the right encoder value public Encoder getRightEncoder() { return (m_rightEncoder); } |
Now it is time to create our new command which we will call DriveForDistanceCommand. Go ahead and create a new class under the commands folder. This time instead of using the ExampleCommand as our starting point, copy the contents of DriveForTimeCommand.java file into your newly created DriveForDistanceCommand.java file. Then rename the file and replace all instances of DriveForTimeCommand with DriveForDistanceCommand.
Since we will not be using a Timer for this class, remove all references to the Timer. This will involve removing the time parameter from the constructor and having isFinished() function return false.
This will give us a better starting point. Your new file should look like:
|
1 2 3 4 5 6 7 8 9 10 11 12 13 14 15 16 17 18 19 20 21 22 23 24 25 26 27 28 29 30 31 32 33 34 35 36 37 38 39 40 41 42 43 44 45 46 47 48 49 50 51 52 53 54 55 56 57 58 59 60 61 62 63 64 65 66 67 |
/*----------------------------------------------------------------------------*/ /* Copyright (c) 2018-2019 FIRST. All Rights Reserved. */ /* Open Source Software - may be modified and shared by FRC teams. The code */ /* must be accompanied by the FIRST BSD license file in the root directory of */ /* the project. */ /*----------------------------------------------------------------------------*/ package frc.robot.commands; import edu.wpi.first.wpilibj2.command.Command; import frc.robot.subsystems.DriveSubsystem; import robotCore.Logger; /** * An example command that uses an example subsystem. */ public class DriveForDistanceCommand extends Command { private final DriveSubsystem m_subsystem; private double m_power; /** * Creates a new DriveForDistanceCommand. * * @param subsystem The subsystem used by this command. */ public DriveForDistanceCommand(DriveSubsystem subsystem, double power) { Logger.log("DriveForDistanceCommand", 3, "DriveForDistanceCommand()"); m_subsystem = subsystem; //Save the parameter for motor power m_power = power; // Use addRequirements() here to declare subsystem dependencies. addRequirements(m_subsystem); } // Called when the command is initially scheduled. @Override public void initialize() { Logger.log("DriveForDistanceCommand", 2, "initialize()"); m_subsystem.setPower(m_power, m_power); } // Called every time the scheduler runs while the command is scheduled. @Override public void execute() { Logger.log("DriveForDistanceCommand", -1, "execute()"); } // Called once the command ends or is interrupted. @Override public void end(boolean interrupted) { Logger.log("DriveForDistanceCommand", 2, String.format("end(%b)", interrupted)); //Set motor powers to zero. Stop them! m_subsystem.setPower(0, 0); } // Returns true when the command should end. @Override public boolean isFinished() { Logger.log("DriveForDistanceCommand", -1, "isFinished()"); return (false); } } |
Next we want to change our constructor to take a distance instead of a time. We also need to get the encoders from the DriveSubsystem. To measure the distance we can use either of the encoders but for this command we will use the left encoder.
Steps:
- Define class variable after the “class” line (m_distance, m_leftEncoder)
- Add distance variable to the constructor parameters
- In the constructor, save the incoming distance value to the m_distance class variable (so it’s available to other methods in this class).
- In the constructor, get and save the initial value of the left encoder.
- Import Encoder.
DriveForDistanceCommand.java should look like this:
|
1 2 3 4 5 6 7 8 9 10 11 12 13 14 15 16 17 18 19 20 21 22 |
public class DriveForDistanceCommand extends Command { private final DriveSubsystem m_subsystem; private double m_power; private double m_distance; private Encoder m_leftEncoder; /** * Creates a new DriveForDistanceCommand. * * @param subsystem The subsystem used by this command. */ public DriveForDistanceCommand(DriveSubsystem subsystem, double power, double distance) { Logger.log("DriveForDistanceCommand", 3, "DriveForDistanceCommand()"); m_subsystem = subsystem; m_power = power; m_distance = distance; m_leftEncoder = subsystem.getLeftEncoder(); // Use addRequirements() here to declare subsystem dependencies. addRequirements(m_subsystem); } |
Again, when you import the declaration for Encoder be sure to choose the one from robotCore.
In the initialize() function we need to reset the Encoder so that it counts from zero each time we run this command. Remember that the encoder we receive from the DriveSubsystem is our own copy so resetting it will not affect the DriveSubsystem or any other commands with use the encoders.
|
1 2 3 4 5 6 7 8 9 |
public void initialize() { Logger.log("DriveForDistanceCommand", 2, "initialize()"); //Set starting power m_subsystem.setPower(m_power, m_power); //Reset Encoder before using m_leftEncoder.reset(); } |
The last thing we need to do is change the isFinished() function to return true when the distance is greater than or equal to the target distance:
|
1 2 3 4 5 |
public boolean isFinished() { Logger.log("DriveForDistanceCommand", -1, "isFinished()"); return (m_leftEncoder.get() >= m_distance); } |
Your DriveForDistanceCommand.java file should now look like:
|
1 2 3 4 5 6 7 8 9 10 11 12 13 14 15 16 17 18 19 20 21 22 23 24 25 26 27 28 29 30 31 32 33 34 35 36 37 38 39 40 41 42 43 44 45 46 47 48 49 50 51 52 53 54 55 56 57 58 59 60 61 62 63 64 65 66 67 68 69 70 71 72 73 74 75 76 77 78 |
/*----------------------------------------------------------------------------*/ /* Copyright (c) 2018-2019 FIRST. All Rights Reserved. */ /* Open Source Software - may be modified and shared by FRC teams. The code */ /* must be accompanied by the FIRST BSD license file in the root directory of */ /* the project. */ /*----------------------------------------------------------------------------*/ package frc.robot.commands; import edu.wpi.first.wpilibj2.command.Command; import frc.robot.subsystems.DriveSubsystem; import robotCore.Encoder; import robotCore.Logger; /** * An example command that uses an example subsystem. */ public class DriveForDistanceCommand extends Command { private final DriveSubsystem m_subsystem; private double m_power; //motor power percent. 0.0 to 1.0 private double m_distance; private Encoder m_leftEncoder; /** * Creates a new DriveForDistanceCommand. * * @param subsystem The subsystem used by this command. */ public DriveForDistanceCommand(DriveSubsystem subsystem, double power, double distance) { Logger.log("DriveForDistanceCommand", 3, "DriveForDistanceCommand()"); m_subsystem = subsystem; m_power = power; m_distance = distance; m_leftEncoder = subsystem.getLeftEncoder(); //Save the parameter variables for motor power and run time m_power = power; // Use addRequirements() here to declare subsystem dependencies. addRequirements(m_subsystem); } // Called when the command is initially scheduled. @Override public void initialize() { Logger.log("DriveForDistanceCommand", 2, "initialize()"); //Set starting power m_subsystem.setPower(m_power, m_power); //Reset the Encoder before using m_leftEncoder.reset(); } // Called every time the scheduler runs while the command is scheduled. @Override public void execute() { Logger.log("DriveForDistanceCommand", -1, "execute()"); } // Called once the command ends or is interrupted. @Override public void end(boolean interrupted) { Logger.log("DriveForDistanceCommand", 2, String.format("end(%b)", interrupted)); //Set motor powers to zero. Stop them! m_subsystem.setPower(0, 0); } // Returns true when the command should end. @Override public boolean isFinished() { Logger.log("DriveForDistanceCommand", -1, "isFinished()"); return (m_leftEncoder.get() >= m_distance); } } |
We now need configure joystick button 2 so when it is pressed we will run the DriveForDistanceCommand. Add one line to RobotContainer‘s configureButtonbindings() method:
|
1 2 3 4 |
private void configureButtonBindings() { m_joystick.button(1).onTrue(new DriveForTimeCommand(m_driveSubsystem, 0.50, 3.0)); m_joystick.button(2).onTrue(new DriveForDistanceCommand(m_driveSubsystem, 0.75, 2000)); } |
Note that the distance that we are passing in are in somewhat arbitrary units. The Encoder counts are somewhat arbitrary as they depend on the particular motor/encoder and the size of the wheel. We have chosen 2000 here just to test this command. Later we will perform a conversion which will allow us to use real world units such as inches.
Your RobotContainer.java file should now look like:
|
1 2 3 4 5 6 7 8 9 10 11 12 13 14 15 16 17 18 19 20 21 22 23 24 25 26 27 28 29 30 31 32 33 34 35 36 37 38 39 40 41 42 43 44 45 46 47 48 49 50 51 52 53 54 55 56 57 58 59 60 61 62 63 64 65 66 |
/*----------------------------------------------------------------------------*/ /* Copyright (c) 2018-2019 FIRST. All Rights Reserved. */ /* Open Source Software - may be modified and shared by FRC teams. The code */ /* must be accompanied by the FIRST BSD license file in the root directory of */ /* the project. */ /*----------------------------------------------------------------------------*/ package frc.robot; import edu.wpi.first.wpilibj2.command.Command; import edu.wpi.first.wpilibj2.command.button.CommandJoystick; import frc.robot.commands.DriveForTimeCommand; import frc.robot.commands.ArcadeDriveCommand; import frc.robot.commands.DriveForDistanceCommand; import frc.robot.subsystems.DriveSubsystem; import frc.robot.subsystems.ExampleSubsystem; /** * This class is where the bulk of the robot should be declared. Since * Command-based is a "declarative" paradigm, very little robot logic should * actually be handled in the {@link Robot} periodic methods (other than the * scheduler calls). Instead, the structure of the robot (including subsystems, * commands, and button mappings) should be declared here. */ public class RobotContainer { // The robot's subsystems and commands are defined here... @SuppressWarnings("unused") private final ExampleSubsystem m_exampleSubsystem = new ExampleSubsystem(); private final DriveSubsystem m_driveSubsystem = new DriveSubsystem(); private final CommandJoystick m_joystick = new CommandJoystick(0); private final ArcadeDriveCommand m_autoCommand = null; // new ExampleCommand(m_exampleSubsystem); /** * The container for the robot. Contains subsystems, OI devices, and commands. */ public RobotContainer() { m_driveSubsystem.setDefaultCommand(new ArcadeDriveCommand(m_driveSubsystem, m_joystick)); // Configure the button bindings configureButtonBindings(); } /** * Use this method to define your button->command mappings. Buttons can be * created by instantiating a {@link GenericHID} or one of its subclasses * ({@link edu.wpi.first.wpilibj.Joystick} or {@link XboxController}), and then * passing it to a {@link edu.wpi.first.wpilibj2.command.button.JoystickButton}. */ private void configureButtonBindings() { m_joystick.button(1).onTrue(new DriveForTimeCommand(m_driveSubsystem, 0.50, 3.0)); m_joystick.button(2).onTrue(new DriveForDistanceCommand(m_driveSubsystem, 0.75, 2000)); } /** * Use this to pass the autonomous command to the main {@link Robot} class. * * @return the command to run in autonomous */ public Command getAutonomousCommand() { // An ExampleCommand will run in autonomous return m_autoCommand; } } |
>>>> KAT Update Progress Marker –Code block above uses m_power instead of m_speed. Changed later?
Now run your program and click the B2 button. You should find that your robot will drive a short distance and then stop. Also note that since we are now using distance rather than time, we can change the speed and the robot should still move the same distance. Try it out and see.