Now that we have a DriveSubsystem to control the motors we are going to want to do something with it. In this programming model we use commands to control actions. In this chapter we are going to create a command which will cause the robot to drive forward for a specific amount of time.
You can think of commands as being a little like the following loop:
|
1 2 3 4 5 6 |
command.init(); do { command.execute(); } while(!command.isFinished()); command.end(); |
In fact, it’s more complicated, because these calls will be interleaved with other periodic commands, but that’s the basic idea. We do things this way to allow many such loops to run at the same time.
Like with DriveSubsystem, we need to:
- Create the new class called DriveForTimeCommand under the commands folder. Like we did with the DriveSubsystem, copy the ExampleCommand and paste it into the commands folder.
- Change the name of the copy to DriveForTimeCommand.java.
- In that file, search and replace all instances of ExampleCommand with DriveForTimeCommand.
- Also, since this command will be using the DriveSubsystem, replace all instances of ExampleSubsystem with DriveSubsystem.
- Change the comment describing the purpose of this command (i.e. “An example command that uses an example subsystem”) to one that describes this command.
After you have done that you DriveForTimeCommand.java file should look like:
|
1 2 3 4 5 6 7 8 9 10 11 12 13 14 15 16 17 18 19 20 21 22 23 24 25 26 27 28 29 30 31 32 33 34 35 36 37 38 39 40 41 42 43 44 45 46 47 48 49 50 51 52 53 54 55 56 57 |
/*----------------------------------------------------------------------------*/ /* Copyright (c) 2018-2019 FIRST. All Rights Reserved. */ /* Open Source Software - may be modified and shared by FRC teams. The code */ /* must be accompanied by the FIRST BSD license file in the root directory of */ /* the project. */ /*----------------------------------------------------------------------------*/ package frc.robot.commands; import edu.wpi.first.wpilibj2.command.Command; import frc.robot.subsystems.DriveSubsystem; import robotCore.Logger; /** * Command to drive the robot for a fixed amount of time. */ public class DriveForTimeCommand extends Command { private final DriveSubsystem m_subsystem; /** * Creates a new DriveForTiimeCommand. * * @param subsystem The subsystem used by this command. */ public DriveForTimeCommand(DriveSubsystem subsystem) { Logger.log("DriveForTiimeCommand", 3, "DriveForTiimeCommand()"); m_subsystem = subsystem; // Use addRequirements() here to declare subsystem dependencies. addRequirements(m_subsystem); } // Called when the command is initially scheduled. @Override public void initialize() { Logger.log("DriveForTiimeCommand", 2, "initialize()"); } // Called every time the scheduler runs while the command is scheduled. @Override public void execute() { Logger.log("DriveForTiimeCommand", -1, "execute()"); } // Called once the command ends or is interrupted. @Override public void end(boolean interrupted) { Logger.log("DriveForTiimeCommand", 2, String.format("end(%b)", interrupted)); } // Returns true when the command should end. @Override public boolean isFinished() { Logger.log("DriveForTiimeCommand", -1, "isFinished()"); return false; } } |
Let’s take a look at the constructor:
|
1 2 3 4 5 6 7 |
public DriveForTimeCommand(DriveSubsystem subsystem) { Logger.log("DriveForTimeCommand", 3, "DriveForTimeCommand()"); m_subsystem = subsystem; // Use addRequirements() here to declare subsystem dependencies. addRequirements(m_subsystem); } |
The first thing to do is save a copy of the incoming parameter “subsystem” (a DriveSubsystem object) to a member variable, “m_subsystem”. This let’s us access it later.
Second, it is here that we will specify which Subsystems this command will require. We do this by calling the addRequirements(…) passing in the DriveSubsystem instance we just saved. It is important we do this because this is how the command system keeps track of which commands need which subsystems and makes sure that only one command at a time has access to a particular subsystem. If we get this wrong, we might end up with mysterious problems where two commands are fighting for control of the same motor.
The next function initialize() is called whenever this command starts. In our case, when the command runs we want to start the robot moving forward. Also we are going to want to have a timer to control how long the robot will drive and we will need to reset that timer when the command starts.
We need to:
- Create a Timer object, m_timer
- Import the Timer class (we could do this first, but VS helps us import it if we create it first).
- Add timer commands to initialize().
First, declare and initialize the variable m_timer at the top of our class.
|
1 |
private Timer m_timer = new Timer(); |
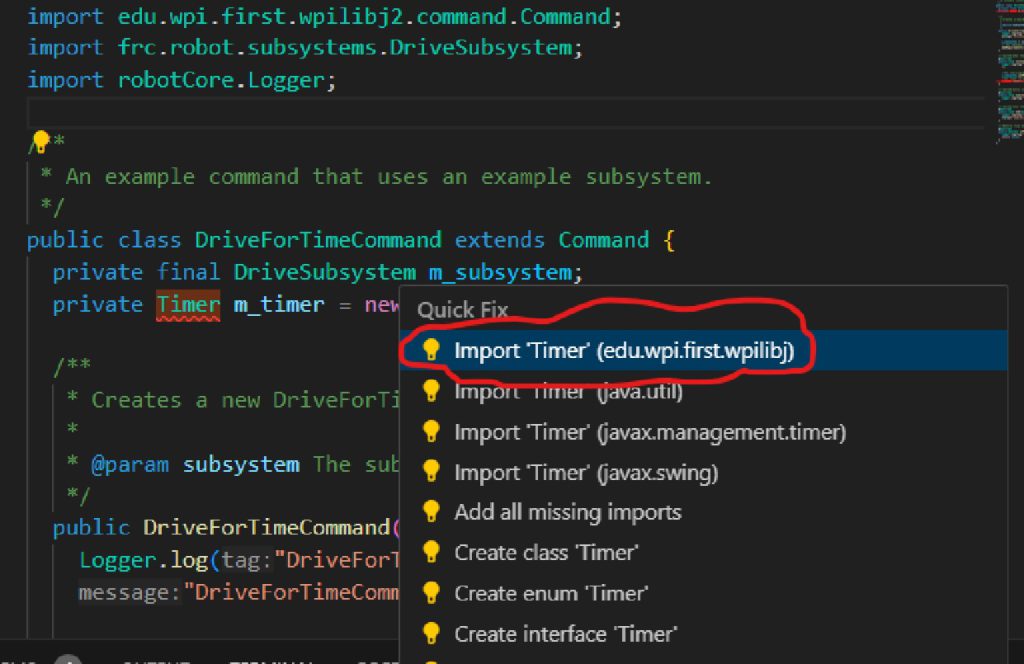
Java doesn’t know where to get the Timer class, so you need to import it. Click on Timer and press CTRL + ., you will see multiple possible choices. We want to choose the version from edu.wpi.first.wpilibj:
Finally, add the timer commands to initialize(). The commands are reset() to set the timer back to zero, and start() to start it for this run.
|
1 2 3 4 5 6 7 8 9 10 11 12 |
// Called when the command is initially scheduled. @Override public void initialize() { Logger.log("DriveForTimeCommand", 2, "initialize()"); m_subsystem.setPower(0.75, 0.75); //Set timer to zero m_timer.reset(); //Start the timer m_timer.start(); } |
The next function in our class, execute(), is called repeatedly as long as this command is running. Since we are simply going to continue driving until the timer expires, we don’t need to do anything special here.
Next there is the end() function which is called when a command ends. When this happens we want to turn the motors off:
|
1 2 3 4 5 6 7 8 9 10 |
// Called once the command ends or is interrupted. @Override public void end(boolean interrupted) { Logger.log("DriveForTimeCommand", 2, String.format("end(%b)", interrupted)); //Set motor powers to zero. Stop them! m_subsystem.setPower(0, 0); } |
Finally there is the isFinished() function. This function is also called repeatedly as long as the command is running, and should return false if it wants the command to continue, and true if it wants it to end. In our case, we want the command to end when the timer exceeds (or equals) 2 seconds:
|
1 2 3 4 5 6 7 |
// Returns true when the command should end. @Override public boolean isFinished() { Logger.log("DriveForTimeCommand", -1, "isFinished()"); return(m_timer.get() >= 2); } |
Your DriveForTimeCommand.java file should now look like:
|
1 2 3 4 5 6 7 8 9 10 11 12 13 14 15 16 17 18 19 20 21 22 23 24 25 26 27 28 29 30 31 32 33 34 35 36 37 38 39 40 41 42 43 44 45 46 47 48 49 50 51 52 53 54 55 56 57 58 59 60 61 62 63 64 65 66 67 68 69 70 71 72 |
/*----------------------------------------------------------------------------*/ /* Copyright (c) 2018-2019 FIRST. All Rights Reserved. */ /* Open Source Software - may be modified and shared by FRC teams. The code */ /* must be accompanied by the FIRST BSD license file in the root directory of */ /* the project. */ /*----------------------------------------------------------------------------*/ package frc.robot.commands; import edu.wpi.first.wpilibj.Timer; import edu.wpi.first.wpilibj2.command.Command; import frc.robot.subsystems.DriveSubsystem; import robotCore.Logger; /** * An example command that uses an example subsystem. */ public class DriveForTimeCommand extends Command { private final DriveSubsystem m_subsystem; private Timer m_timer = new Timer(); /** * Creates a new DriveForTimeCommand. * * @param subsystem The subsystem used by this command. */ public DriveForTimeCommand(DriveSubsystem subsystem) { Logger.log("DriveForTimeCommand", 3, "DriveForTimeCommand()"); m_subsystem = subsystem; // Use addRequirements() here to declare subsystem dependencies. addRequirements(m_subsystem); } // Called when the command is initially scheduled. @Override public void initialize() { Logger.log("DriveForTimeCommand", 2, "initialize()"); //Set starting power m_subsystem.setPower(0.75, 0.75); //Set timer to zero m_timer.reset(); //Start the timer m_timer.start(); } // Called every time the scheduler runs while the command is scheduled. @Override public void execute() { Logger.log("DriveForTimeCommand", -1, "execute()"); } // Called once the command ends or is interrupted. @Override public void end(boolean interrupted) { Logger.log("DriveForTimeCommand", 2, String.format("end(%b)", interrupted)); //Set motor powers to zero. Stop them! m_subsystem.setPower(0, 0); } // Returns true when the command should end. @Override public boolean isFinished() { Logger.log("DriveForTimeCommand", -1, "isFinished()"); return(m_timer.get() >= 2); } } |
Now we need to provide some way to run this command and we will do this by tying this command to a button on the joystick (or for now, an emulated joystick). The place to do this is in the RobotContainer class that we mentioned previously. Be sure to save your DriveForTimeCommand.java file and then open the RobotContainer.java file by clicking on it in the left pane.
Since we will be using the joystick, we need to create an instance of the Joystick class. We are also going to need an instance of the DriveSubsystem so we declare that here as well. We do this by adding the following to the RobotContainer class:
|
1 2 3 4 5 6 |
public class RobotContainer { // The robot's subsystems and commands are defined here... @SuppressWarnings("unused") private final ExampleSubsystem m_exampleSubsystem = new ExampleSubsystem(); private final DriveSubsystem m_driveSubsystem = new DriveSubsystem(); private final CommandJoystick m_joystick = new CommandJoystick(0); |
The declaration of m_driveSubsystem creates an instance of our DriveSubsystem class.
The declaration of m_joystick creates an instance CommandJoystick number 0. Our implementation of the CommandJoystick class really only supports a single joystick, but the joystick number is included in the constructor to be consistent with the FRC library which supports multiple joysticks.
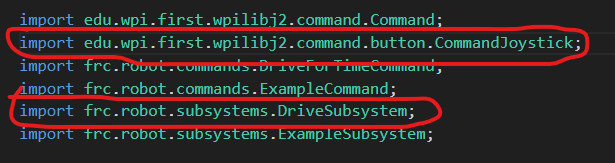
Note that we need to import the packages for these new objects. Do this just like we did earlier: Hover over the class name, then select Quick Fix. Do this for both DriveSubsystem and CommandJoystick. The latter looks like this:

…and the import lines…
Now we need to connect a button to our DriveForTimeCommand. We will do this in the configureButtonBindings() function of the RobotContainer:
|
1 2 3 |
private void configureButtonBindings() { m_joystick.button(1).onTrue(new DriveForTimeCommand(m_driveSubsystem)); } |
Here we create a instance of our DriveForTimeCommand, passing in our instance of the DriveSubsystem, and tell the CommandJoystick button(1) object to call that instance when the button is pressed. Make sure to get the import line for it.
This is an example of event-driven programming. We’re not checking the state of the button and then doing something; instead we’re defining something that should happen whenever the button is pressed.
Your RobotContainer.java file should now look like:
|
1 2 3 4 5 6 7 8 9 10 11 12 13 14 15 16 17 18 19 20 21 22 23 24 25 26 27 28 29 30 31 32 33 34 35 36 37 38 39 40 41 42 43 44 45 46 47 48 49 50 51 52 53 54 55 56 57 58 59 60 61 62 |
/*----------------------------------------------------------------------------*/ /* Copyright (c) 2018-2019 FIRST. All Rights Reserved. */ /* Open Source Software - may be modified and shared by FRC teams. The code */ /* must be accompanied by the FIRST BSD license file in the root directory of */ /* the project. */ /*----------------------------------------------------------------------------*/ package frc.robot; import edu.wpi.first.wpilibj2.command.Command; import edu.wpi.first.wpilibj2.command.button.CommandJoystick; import frc.robot.commands.DriveForTimeCommand; import frc.robot.commands.ExampleCommand; import frc.robot.subsystems.DriveSubsystem; import frc.robot.subsystems.ExampleSubsystem; /** * This class is where the bulk of the robot should be declared. Since * Command-based is a "declarative" paradigm, very little robot logic should * actually be handled in the {@link Robot} periodic methods (other than the * scheduler calls). Instead, the structure of the robot (including subsystems, * commands, and button mappings) should be declared here. */ public class RobotContainer { // The robot's subsystems and commands are defined here... @SuppressWarnings("unused") private final ExampleSubsystem m_exampleSubsystem = new ExampleSubsystem(); private final DriveSubsystem m_driveSubsystem = new DriveSubsystem(); private final CommandJoystick m_joystick = new CommandJoystick(0); private final ExampleCommand m_autoCommand = null; // new ExampleCommand(m_exampleSubsystem); /** * The container for the robot. Contains subsystems, OI devices, and commands. */ public RobotContainer() { // Configure the button bindings configureButtonBindings(); } /** * Use this method to define your button->command mappings. Buttons can be * created by instantiating a {@link GenericHID} or one of its subclasses * ({@link edu.wpi.first.wpilibj.Joystick} or {@link XboxController}), and then * passing it to a {@link edu.wpi.first.wpilibj2.command.button.JoystickButton}. */ private void configureButtonBindings() { m_joystick.button(1).onTrue(new DriveForTimeCommand(m_driveSubsystem)); } /** * Use this to pass the autonomous command to the main {@link Robot} class. * * @return the command to run in autonomous */ public Command getAutonomousCommand() { // An ExampleCommand will run in autonomous return m_autoCommand; } } |
Now run your program (remember that if your program is already running, you need to stop it using the red stop button ![]() ) and connect and enable your robot from the Driver Station. Since you don’t have an actual joystick attached to your computer, click the Enable Virtual Joystick checkbox which will allow you to use a simulated joystick.
) and connect and enable your robot from the Driver Station. Since you don’t have an actual joystick attached to your computer, click the Enable Virtual Joystick checkbox which will allow you to use a simulated joystick.

With your robot enabled, click the B1 button and your robot should drive forward for 2 seconds (make sure you put your robot on the floor!)
Before we move on, let’s try and make this command more useful. Right now it is always driving the robot at 75% power, and always for 2 seconds. We would like to change this command so that we can control both the time and the speed.
The place to set these values is when we call the DriveForTimeCommand constructor. We add two parameters, power and time to the constructor and add two member variables m_power and m_time to store these values:
|
1 2 3 4 5 6 7 8 9 10 11 12 13 14 15 16 17 18 19 20 21 22 23 |
public class DriveForTimeCommand extends Command { private final DriveSubsystem m_subsystem; private Timer m_timer = new Timer(); private double m_power; //motor power percent. 0.0 to 1.0 private double m_time; //motor run time (both motors), seconds /** * Creates a new DriveForTimeCommand. * * @param subsystem The subsystem used by this command. */ public DriveForTimeCommand(DriveSubsystem subsystem, double power, double time) { Logger.log("DriveForTimeCommand", 3, "DriveForTimeCommand()"); m_subsystem = subsystem; //Save the parameter variables for motor power and run time m_power = power; m_time = time; // Use addRequirements() here to declare subsystem dependencies. addRequirements(m_subsystem); } |
(Note that good programming practice avoids putting constants in your code. So creating variables for these, with meaningful variable names and comments, makes for better code.)
Now in our initialize() function we need to run the robot at the specified m_power:
|
1 2 3 4 5 6 7 8 9 |
public void initialize() { Logger.log("DriveForTimeCommand", 2, "initialize()"); m_subsystem.setPower(m_power, m_power); //Set timer to zero m_timer.reset(); //Start the timer m_timer.start(); } |
Finally, we need to change our isFinished() function to use the specified m_time:
|
1 2 3 4 5 |
public boolean isFinished() { Logger.log("DriveForTimeCommand", -1, "isFinished()"); return(m_timer.get() >= m_time); } |
Your DriveForTimeCommand.java file should now look like:
|
1 2 3 4 5 6 7 8 9 10 11 12 13 14 15 16 17 18 19 20 21 22 23 24 25 26 27 28 29 30 31 32 33 34 35 36 37 38 39 40 41 42 43 44 45 46 47 48 49 50 51 52 53 54 55 56 57 58 59 60 61 62 63 64 65 66 67 68 69 70 71 72 73 74 75 76 77 78 79 |
/*----------------------------------------------------------------------------*/ /* Copyright (c) 2018-2019 FIRST. All Rights Reserved. */ /* Open Source Software - may be modified and shared by FRC teams. The code */ /* must be accompanied by the FIRST BSD license file in the root directory of */ /* the project. */ /*----------------------------------------------------------------------------*/ package frc.robot.commands; import edu.wpi.first.wpilibj.Timer; import edu.wpi.first.wpilibj2.command.Command; import frc.robot.subsystems.DriveSubsystem; import robotCore.Logger; /** * An example command that uses an example subsystem. */ public class DriveForTimeCommand extends Command { private final DriveSubsystem m_subsystem; private Timer m_timer = new Timer(); private double m_power; //motor power percent. 0.0 to 1.0 private double m_time; //motor run time (both motors), seconds /** * Creates a new DriveForTimeCommand. * * @param subsystem The subsystem used by this command. */ public DriveForTimeCommand(DriveSubsystem subsystem, double power, double time) { Logger.log("DriveForTimeCommand", 3, "DriveForTimeCommand()"); m_subsystem = subsystem; //Save the parameter variables for motor power and run time m_power = power; m_time = time; // Use addRequirements() here to declare subsystem dependencies. addRequirements(m_subsystem); } // Called when the command is initially scheduled. @Override public void initialize() { Logger.log("DriveForTimeCommand", 2, "initialize()"); //Set starting power m_subsystem.setPower(m_power, m_power); //Set timer to zero m_timer.reset(); //Start the timer m_timer.start(); } // Called every time the scheduler runs while the command is scheduled. @Override public void execute() { Logger.log("DriveForTimeCommand", -1, "execute()"); } // Called once the command ends or is interrupted. @Override public void end(boolean interrupted) { Logger.log("DriveForTimeCommand", 2, String.format("end(%b)", interrupted)); //Set motor powers to zero. Stop them! m_subsystem.setPower(0, 0); } // Returns true when the command should end. @Override public boolean isFinished() { Logger.log("DriveForTimeCommand", -1, "isFinished()"); return(m_timer.get() >= m_time); } } |
You will no notice that your RobotContainer class now has an error on the line where we create an instance of DriveForTimeCommand. Hovering over the error marker it tells us:
|
1 |
The constructor DriveForTimeCommand(DriveSubsystem) is undefined |
The reason it is telling us this is that there is no longer a constructor for this class that takes only one argument (remember that we changed the constructor). So what we must do is provide the proper arguments for the updated constructor. Lets have our robot drive forward at 0.50 power for 3 seconds:
|
1 2 3 |
private void configureButtonBindings() { m_joystick.button(1).onTrue(new DriveForTimeCommand(m_driveSubsystem, 0.50, 3.0)); } |
Now deploy and run your program. Verify the robot now drives at half power for three seconds.
You might notice that your robot is not driving quite straight but don’t worry, we will address this issue later.