The first thing you need to do is to connect your computer to the your robot (be sure that you have connected the battery). Each robot is configured as a WiFi hotspot with a specific name which is stamped on your robot (eg. Robot01). Now connect your computer’s WiFi to that hotspot.
NOTE that it may take up to 20 seconds for the robot’s WiFi to show up after you plug it in!.
Do not worry if it says your WiFi has no internet.
Next, let’s take a look at the run configurations. The run configuration determines how VS Code will run your program. In our case we need to set it up so that the program will run on your robot, not on your PC.
Select the Run / Open Configurations menu option:

Which should display the following in the right pane:
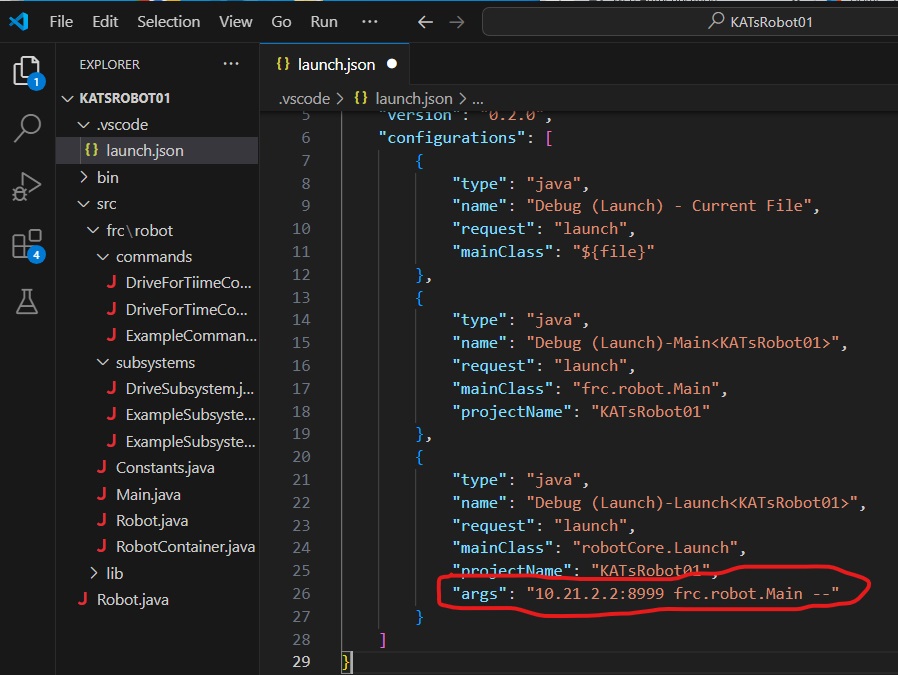
This shows the available run configurations. The one we are interested in is the last one. This one is not configured to run your program on the PC, but, rather, to run a program which will copy your program to the robot, and then execute your program on the robot. The important thing to note here is the last line of the configuration:
|
1 |
"args": "10.21.2.2:8999 frc.robot.Main --" |
This line tells the program the IP address of your Raspberry Pi, as well as what port to use to transfer the program. It also tells the program what main class to execute once the program has been download. By default the IP address is 10.21.2.2 with port 8999. (If this is not how your Robot/Raspberry Pi is configured, you will need to change it to this.)
In order for any of this to work, we must have a program running on the Raspberry Pi which listens on port 8999. Your PC will then connect to this port and transfer your program to the Pi for execution. We will use a utility called PuTTY to start this program on the Pi.
If you are using one of our laptops, we have configured PuTTY for you. However if you are using your own computer, you will need to configure it yourself. Instructions can be found here.
Now, start the Driver Station by double clicking PiDriverStation in the Utils folder. In there you will see PiDriverStation.jar. Double click it. You should see this window:
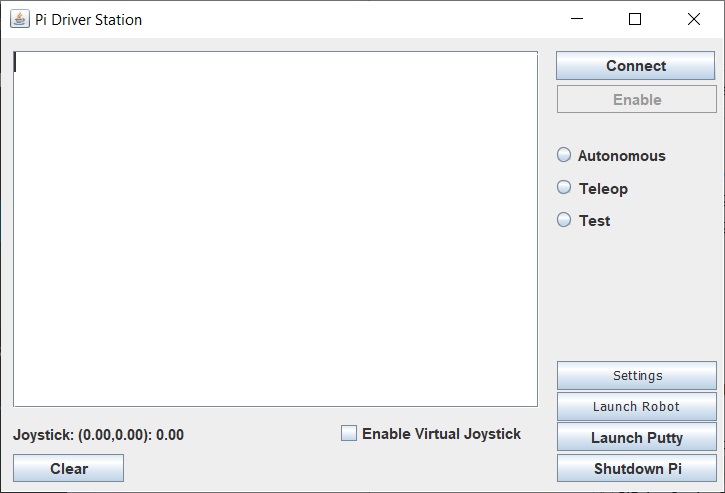
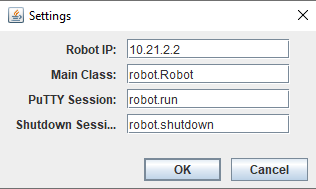
Now we must configure the driver station by clicking the Settings button and set the fields as follows:
Now with your computer connected to the robot, click on the Launch Putty button on the Driver Station. If everything is working the following console window should open:
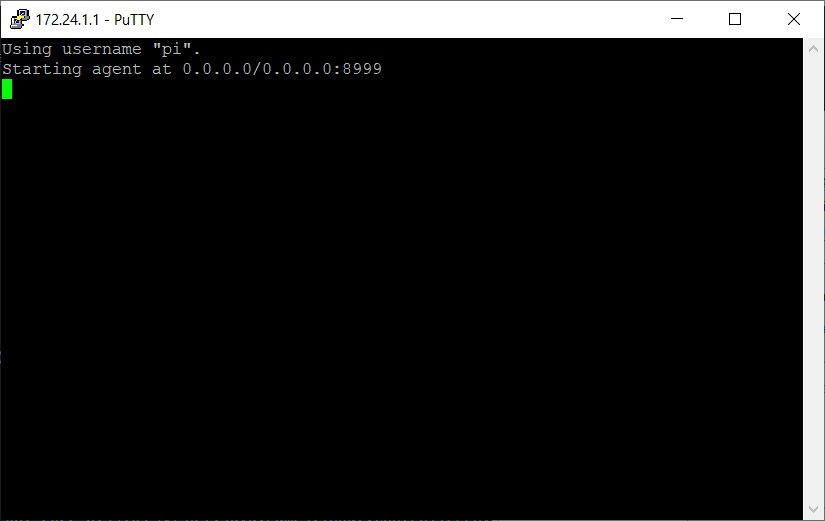
If you don’t see this window, or the two lines you see aren’t being displayed, then something is wrong.
With this PuTTY window open, we are finally ready to run our program. One last thing we must do is configure VSCode to launch the correct configuration. In VSCode click on the ![]() button on the left. Then open the Debug dropdown and choose the last Launch option.
button on the left. Then open the Debug dropdown and choose the last Launch option.

We can now run our program by choosing the Run / Start Debugging option from the menu or pressing F5. When you run your program, you should see something like this:
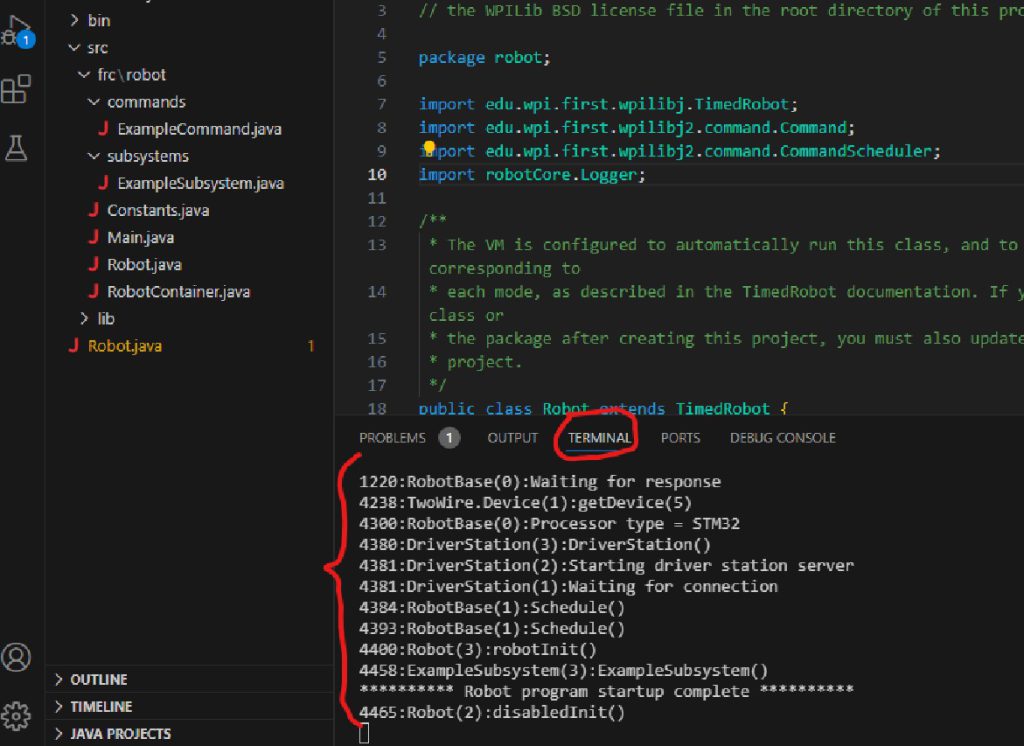
The output you see in the TERMINAL window at the bottom comes from the Logger statements we discussed earlier. You can add your own logging commands to output to this window when your program is running.
Now that the program is running, on the Driver Station connect to the robot by clicking the Connect button. Two things will happen. First, the Connect button will change names and say Disconnect. Second, the Terminal window will show a new line (highlighted in yellow here, but it’ll be white in the Terminal window.)

At this point your robot is disabled. To enable the robot, click the Enable button.

After hitting Enable, this button changes to Disable. The Terminal window shows:

Here we can see the logging indicates that the robot has connected to the Driver Station, was Enabled and now has teleop mode running. [NOTE: ’24 logging doesn’t show this. Two log messages are missing from the end: Robot(2):teleopInit() and ArduinoConnection(3):Enabled. -KAT)
On a final note, when starting a whole new session, these are the steps that you must take to get your program running and enabled:
- Connect your PC’s WiFi to the robot.
- Use the Driver Station to start PuTTY.
- Run your program from within VS Code by pressing F5.
- Using the Driver Station, connect to your robot
- Finally use the Driver Station enable your robot.
Once you have launched putty, you do not need to do that again unless you shutdown or reboot your raspberry Pi. When you make changes to your program, to run it again, you need to stop the current version by pressing the stop button (![]() ) at the top, you can then run your program again following steps 3-5.
) at the top, you can then run your program again following steps 3-5.
When you are through working with the robot, it is advisable to shut the Pi down gracefully rather than simply unplugging it. This can be done by clicking the Shutdown Pi on the Driver Station. Once you have done this wait about a minute for the Pi to shut down (you can tell when it is done when the green light on the Pi stops flashing). You can then safely unplug the Pi.