Now that we have a DriveSubsystem to control the motors we are going to want to do something with it. In this programming model we use commands to control actions. In this chapter we are going to create a command which will cause the robot to drive forward for a specific amount of time.
We are going to create a function in the DriveMechanism that will return a command that will perform this task. After the stop() function in DriveMechanism.java add the following function:
|
1 2 3 |
public Command DriveForTime() { } |
When you do this, Command should come up undefined. You need to use the quick fix to import the command but you need to be sure that you import the Command3 version as follows:
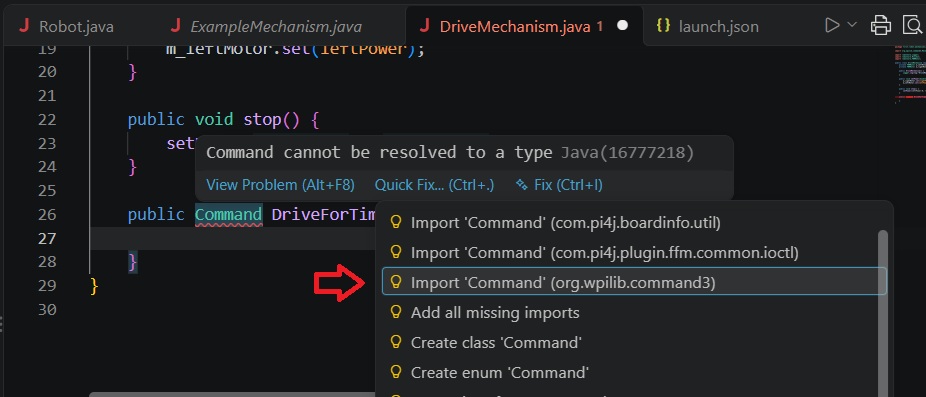
Once you have done this, your Mechanism.java file should look like:
|
1 2 3 4 5 6 7 8 9 10 11 12 13 14 15 16 17 18 19 20 21 22 23 24 25 26 27 28 29 30 31 |
package first.robot.mechanisms; import org.wpilib.command3.Command; import org.wpilib.command3.Mechanism; import robotCore.Logger; import robotCore.Minibot; import robotCore.PWMMotor; public class DriveMechanism implements Mechanism { private PWMMotor m_leftMotor = new PWMMotor(Minibot.LeftMotorPWM, Minibot.LeftMotorDir); private PWMMotor m_rightMotor = new PWMMotor(Minibot.RightMotorPWM, Minibot.RightMotorDir); public DriveMechanism() { Logger.log("DriveMechanism", 1, "DriveMechanism()"); } public void setPower(double leftPower, double rightPower) { m_rightMotor.set(rightPower); m_leftMotor.set(leftPower); } public void stop() { setPower(0, 0); } public Command DriveForTime() { } } |
Note the correct import for Command3 at the top:
|
1 |
import org.wpilib.command3.Command; |
You will now notice that DriveForTime is underlined in red. If you hover over it you will find that the error is “This method must return a result of type Command“. This means that this function should be returning a value and it is not.
What we need to do now is to construct a command that will drive the robot forward at 1/2 power for 3 seconds. To do this, add the following code inside the body of DriveForTime:
|
1 2 3 4 |
public Command DriveForTime() { return new Command() { }; } |
You will now find that the “new Command()” is underlined in red. Hovering over this error we find that:
|
1 2 3 |
The type new Command(){} must implement the inherited abstract method Command.requirements()Java(67109264) The type new Command(){} must implement the inherited abstract method Command.run(Coroutine)Java(67109264) The type new Command(){} must implement the inherited abstract method Command.name() |
What this means is that we need to create those functions in our command. The easiest way to do this is to use the quick fix (you will need to scroll down) and choose to “Add unimplemented methods“
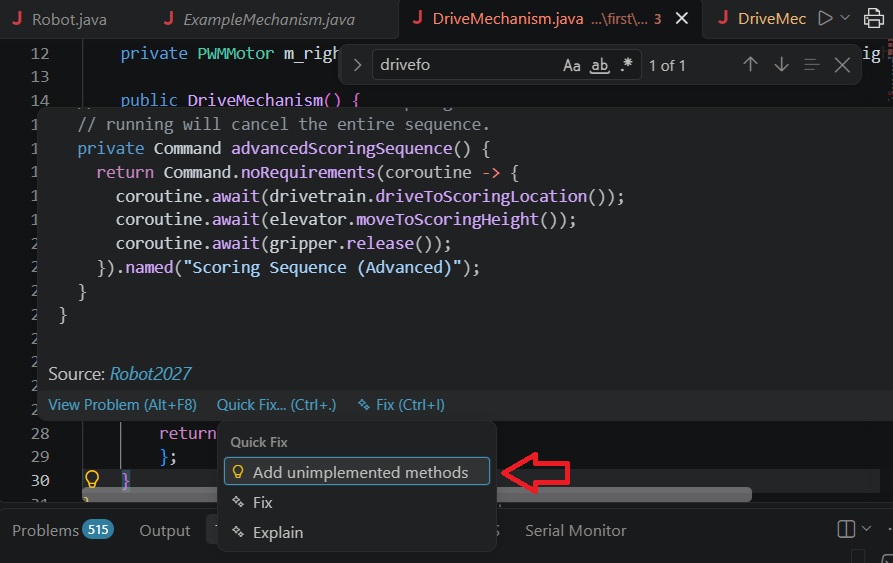
Once you have done this your DriveForTime() function should look like:
|
1 2 3 4 5 6 7 8 9 10 11 12 13 14 15 16 17 18 19 20 21 22 |
public Command DriveForTime() { return new Command() { @Override public void run(Coroutine coroutine) { // TODO Auto-generated method stub throw new UnsupportedOperationException("Unimplemented method 'run'"); } @Override public String name() { // TODO Auto-generated method stub throw new UnsupportedOperationException("Unimplemented method 'name'"); } @Override public Set<Mechanism> requirements() { // TODO Auto-generated method stub throw new UnsupportedOperationException("Unimplemented method 'requirements'"); } }; } |
At this point there should no longer be any errors in the file but we need to actually implement the three functions. For the requirements() function we need to return a set of the Mechanisms that this Command requires. This is a very important step because this is how the command system makes sure that two commands that need a particular Mechanism do not run at the same time. To do this we add the following code. Note we replace the “throw new …” line with our return statement.
|
1 2 3 |
public Set<Mechanism> requirements() { return Set.of(DriveMechanism.this); } |
Next we need to return a name for this command in the name() function:
|
1 2 3 |
public String name() { return "DriveForTime"; } |
The name can be any string and does not need to be unique but should reflect the name of the command. In this case we just make it the same.
Finally we need to create the code that will be executed for this command. What we need to do is to turn the motors on at 0.5 power, wait 3 seconds and then turn the motors off. We can do this as follows:
|
1 2 3 4 5 6 7 |
public void run(Coroutine coroutine) { Logger.log("DriveMechanism", 1, "run starts"); setPower(0.5, 0.5); coroutine.wait(Units.Seconds.of(3)); stop(); Logger.log("DriveMechanism", 1, "run ends"); } |
You may need to import Units but make sure you import the org.wpilib.units.Units version. Also note that we are logging the start of the command and the end. This is useful for later debugging if something is not going as planned.
There is one more thing that we must do before we are done. Normally this command will end after 3 seconds. However if, during those 3 seconds, another command which uses the DriveMechanism is started, this command will be prematurely stopped. When that happens, the stop() function to turn the motors off will not be called. To make sure that stop() is called in all cases we need to add the following code:
|
1 2 3 4 |
@Override public void onCancel() { stop(); } |
Your complete DriveForTime() function should now look like:
|
1 2 3 4 5 6 7 8 9 10 11 12 13 14 15 16 17 18 19 20 21 22 23 24 25 26 27 28 |
public Command driveForTime() { return new Command() { @Override public void run(Coroutine coroutine) { Logger.log("DriveForTime", 1, "starts"); setPower(0.5, 0.5); coroutine.wait(Units.Seconds.of(3)); stop(); Logger.log("DriveForTime", 1, "ends"); } @Override public String name() { return "DriveForTime"; } @Override public Set<Mechanism> requirements() { return Set.of(DriveMechanism.this); } @Override public void onCancel() { stop(); } }; } |
Before we move on, I would like to mention that there is another way to build these commands. WPILib has a class called StagedCommandBuilder. Using this class we can create the driveForTime command as follows:
|
1 2 3 4 5 6 7 8 9 10 11 12 |
public Command driveForTime(double power, double time) { return (new StagedCommandBuilder()).requiring(this). executing(coroutine->{ Logger.log("driveForTime", 1, "Start"); setPower(power, power); coroutine.wait(Units.Seconds.of(time)); stop(); Logger.log("driveForTime", 1, "end"); }). whenCanceled(() -> stop()). named("driveForTimeInline"); } |
You can see that it requires less typing but is also less clear as to what is happening. Let’s analyze it one step at a time. First we create an new instance of the StagedCommandBuilder:
|
1 |
(new StagedCommandBuilder()) |
This class is not itself a Command and could not be returned from the driveForTime() function. What it is is a tool that allows us to build the Command we need. The first step is to call the requiring(…) function:
|
1 |
new StagedCommandBuilder()).requiring(this) |
This function adds the need Mechanism requirement. This function must be the first one called and it returns an instance of an internal builder class (i.e. this is still not a Command). Next we need to tell the Command what to do and we do this by calling the execute(…) function.
|
1 2 3 4 5 6 7 |
(new StagedCommandBuilder()).requiring(this). executing(coroutine->{ Logger.log("driveForTime", 1, "Start"); setPower(power, power); coroutine.wait(Units.Seconds.of(time)); stop(); Logger.log("driveForTime", 1, "end"); }). |
This executing(…) function basically take a snippet of code that will be executed when the command is run. Note that this snippet consists of setting the power, waiting for 3 seconds and then stopping. This executing(…) function also returns the same instance of the internal builder class which is still not a Command.
Next we need to add the code that will stop the robot if the Command is canceled and we do this by calling the whenCanceled() function as follows.
|
1 2 3 4 5 6 7 8 |
(new StagedCommandBuilder()).requiring(this). executing(coroutine->{ Logger.log("driveForTime", 1, "Start"); setPower(power, power); coroutine.wait(Units.Seconds.of(time)); stop(); Logger.log("driveForTime", 1, "end"); }). whenCanceled(() -> stop()) |
Again we supply a snippet of code to execute when canceled and that code is to call the stop() function. Once again, the whenCanceled() function returns the same instance of the same internal builder class which is, like before, not a Command.
Finally we call the named(…) function which gives the command it’s name as follows:
|
1 2 3 4 5 6 7 8 9 |
(new StagedCommandBuilder()).requiring(this). executing(coroutine->{ Logger.log("driveForTime", 1, "Start"); setPower(power, power); coroutine.wait(Units.Seconds.of(time)); stop(); Logger.log("driveForTime", 1, "end"); }). whenCanceled(() -> stop()). named("driveForTime") |
Now, unlike the previous functions, the named(…) function does not return the instance of the internal builder class but, rather, creates a new Command with the proper characteristics that can be returned from our driveForTime() function. This function must the last in the chain.
There is really no advantage to using the StagedCommandBuilder except for saving typing. Throughout this tutorial we will be using the first way of creating Commands but if you are a power user and really understand how to use the StagedCommandBuilder, you are more that welcome to use that instead.
Now that we have created the DriveMechanisim complete with a command to drive the robot we need to create an instance of it somewhere. The place to do it is in Robot.java where we add the following line at the beginning of the class:
|
1 |
final DriveMechanism m_driveMechanism = new DriveMechanism(); |
We are also going to need an instance of the CommandJoystick class so we should also instantiate that here as well.
|
1 2 |
final CommandJoystick m_cmdJoystick = new CommandJoystick(0); |
So your Robot.java would now look like:
|
1 2 3 4 5 6 7 8 9 10 11 12 13 14 15 16 17 18 19 20 21 22 23 24 25 26 27 28 29 30 31 32 33 34 35 36 37 38 39 40 41 42 43 44 45 |
// Copyright (c) FIRST and other WPILib contributors. // Open Source Software; you can modify and/or share it under the terms of // the WPILib BSD license file in the root directory of this project. package first.robot; import org.wpilib.command3.Scheduler; import org.wpilib.framework.OpModeRobot; import first.robot.mechanisms.DriveMechanism; import robotCore.Logger; import robotCore.RobotCore; public class Robot extends OpModeRobot { final DriveMechanism m_driveMechanism = new DriveMechanism(); final CommandJoystick m_cmdJoystick = new CommandJoystick(0); public Robot() { Logger.log("Robot", 2, "Robot()"); } /** * This function is called every robot packet, no matter the mode. Use this for * items like diagnostics that you want ran during disabled, autonomous, * teleoperated and utility. * * This runs after the mode specific periodic functions, but before LiveWindow * and SmartDashboard integrated updating. */ @Override public void robotPeriodic() { Logger.log("Robot", -1, "robotPeriodic()"); RobotCore.getInstance().periodic(); // Must call this! Scheduler.getDefault().run(); } /** * This function is called once each time the robot enters Disabled mode. */ @Override public void disabledInit() { Logger.log("Robot", 1, "disabledInit()"); } } |
Now we need to tie the driveForTime command we created to one of the buttons on the joystick. If you look at the file list for your project you will see that there are two other files that we have not discussed, TeleopOpMode.java and AutoOpMode.java. The robot is able to operate in one of two modes: Teleoperated, where a human controls the robot with a joystick or game controller and Autonomous, where the robot operates without human input. The TeleopOpMode class will be used when operation Teleoperated and the AutoOpMode class is used during Autonomous.
Since we want to tie our driveForTime command to a joystick button, this connection belongs to the TeleopOpMode class. Let’s take a look at that file:
|
1 2 3 4 5 6 7 8 9 10 11 12 13 14 15 16 17 18 19 20 21 22 23 |
package first.robot; import org.wpilib.opmode.OpMode; import org.wpilib.opmode.Teleop; import robotCore.Logger; @Teleop public class TeleopOpMode implements OpMode { public TeleopOpMode(Robot robot) { Logger.log("TeleopOpMode", 1, "TeleopOpMode()"); } @Override public void start() { Logger.log("TeleopOpMode", 2, "start()"); } @Override public void periodic() { } } |
We wee a constructor that will be called when this class is instantiated, a start() function is called when the robot enters teleop mode and a periodic() function which is called every 20ms as long as teleop mode is active.
The constructor is the place where we are going to connect our driveForTime command to the joystick by adding the following line:
|
1 |
m_cmdJoystick.getHID().button(0).onTrue(m_driveMechanism.driveForTime()); |
Your TeleopOpMode.java file should now look like
|
1 2 3 4 5 6 7 8 9 10 11 12 13 14 15 16 17 18 19 20 21 22 23 24 25 26 27 28 29 |
// Copyright (c) FIRST and other WPILib contributors. // Open Source Software; you can modify and/or share it under the terms of // the WPILib BSD license file in the root directory of this project. package first.robot; import org.wpilib.opmode.OpMode; import org.wpilib.opmode.Teleop; import robotCore.Logger; @Teleop public class TeleopOpMode implements OpMode { public TeleopOpMode(Robot robot) { Logger.log("TeleopOpMode", 1, "TeleopOpMode()"); robot.m_cmdJoystick.getHID().button(0).onTrue(robot.m_driveMechanism.driveForTime()); } @Override public void start() { Logger.log("TeleopOpMode", 2, "start()"); } @Override public void periodic() { } } |
Now run your program (remember that if your program is already running, you need to stop it using the red stop button  , or Ctl-C if you are using the newer version of VSCode) and connect and enable your robot from the Driver Station. Since you don’t have an actual joystick attached to your computer, click the Enable Virtual Joystick checkbox which will allow you to use a simulated joystick.

With your robot enabled, press and the B1 button and your robot should drive forward for about 3 seconds.
Before we move on, let’s try and make this command more useful. Right now it is always driving the robot at 50% power, and always for 3 seconds. We would like to change this command so that we can control both the time and the speed.
The place to set these values is when we call the driveForTime function so we add two parameters, power and time to the function and then use those values to set the power and wait time later in the code.
Your driveForTime(…) function in DriveMechanisim.java should now look like:
|
1 2 3 4 5 6 7 8 9 10 11 12 13 14 15 16 17 18 19 20 21 22 23 24 25 26 27 |
public Command driveForTime(double power, double time) { return new Command() { @Override public void run(Coroutine coroutine) { Logger.log("DriveForTime", 1, "starts"); setPower(power, power); coroutine.wait(Units.Seconds.of(time)); stop(); Logger.log("DriveForTime", 1, "ends"); } @Override public String name() { return "DriveForTime"; } @Override public Set<Mechanism> requirements() { return Set.of(DriveMechanism.this); } @Override public void onCancel() { stop(); } }; } |
You will no notice that your TeleopOpMode class now has an error on the line where we make the call to driveForTime(). Hovering over the error marker it tells us:
|
1 |
The method driveForTime(double, double) in the type DriveMechanism is not applicable for the arguments () |
The reason it is telling us this is that there is no longer a version of driveForTime which has no arguments (remember that we changed the function to take two arguments). So what we must do is provide the proper arguments for the updated function. Lets have our robot drive forward at 0.75 power for 2 seconds:
|
1 2 3 |
private void configureButtonBindings() { m_joystick.button(1).onTrue(new DriveForTimeCommand(m_driveSubsystem, 0.75, 2)); } |
Now deploy and run your program. Verify the robot now drives at three quarters power for two seconds.
Note that you can create multiple instances of driveForTime connected to different buttons. For example you could make it so that button 2 would drive the robot at full speed for 4 seconds. Try it!
You might notice that your robot is not driving quite straight but don’t worry, we will address this issue later.