So far we have been controlling the motors by setting their power. Unfortunately, this is not ideal because the power only indirectly controls the speed, which is what we are really interested in. As we have already seen, our robot does not exactly drive straight when we apply the same power to both wheels. This is because differences in the motors and the way they are mounted cause them to run at slightly different speeds when the same power is applied.
What we need is some way to tell how far the wheels have turned and how fast. Each of the wheels on this robot have an encoder which will do just that. We will use the encoder to control the distance the robot moves as well as it’s speed.
For our first exercise, we are going to create a new command, similar to our DriveForTimeCommand, that will drive the robot forward a fixed distance, rather than a fixed time. Before that, a word on encoders and how we use them in software.
The encoders that we are using are handled by the Encoder class. We will need to create a separate instance of this class for the left and right motors. The DriveMechanism will eventually need the encoders so we will be adding these to that class. Consulting the Encoder class documentation, we see that the constructor take a encoder type and two integer parameters which specifies the Microcontroller pins to which they are connected. Once again these values are provided via the Minibot class. Using these values we can create our encoder declarations as follows:
|
1 2 3 4 5 6 |
public class DriveMechanism implements Mechanism { private PWMMotor m_leftMotor = new PWMMotor(Minibot.LeftMotorPWM, Minibot.LeftMotorDir); private PWMMotor m_rightMotor = new PWMMotor(Minibot.RightMotorPWM, Minibot.RightMotorDir); private Encoder m_leftEncoder = new Encoder(EncoderType.Quadrature, Minibot.LeftEncoderInt, Minibot.LeftEncoderDir); private Encoder m_rightEncoder = new Encoder(EncoderType.Quadrature, Minibot.RightEncoderInt, Minibot.RightEncoderDir); |
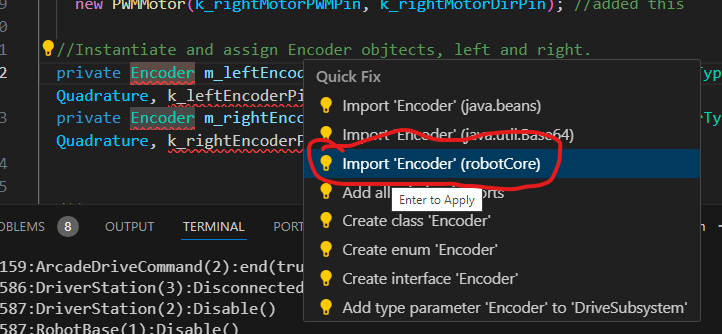
When you import the Encoder class be sure to select the one from RobotCore.
The way the encoders are wired, the left encoder works as expected – when the left wheel moves forward (e.g., moves the robot forward), the encoder counts up. BUT, the right encoder counts down when the wheel moves forward. Rather than having to deal with this throughout the code, we can tell the encoder that it is “inverted” by adding the following to the DriveSubsystem constructor:
|
1 2 3 4 5 |
public DriveMechanism() { Logger.log("DriveMechanism", 1, "DriveMechanism()"); m_rightEncoder.setInverted(true); } |
The call to setInverted(true) tells the encoder to report the reverse of its direction, so it becomes “positive means forward”, like the left encoder.
Your DriveMechanism.java file should now look like:
|
1 2 3 4 5 6 7 8 9 10 11 12 13 14 15 16 17 18 19 20 21 22 23 24 25 26 27 28 29 30 31 32 33 34 35 36 37 38 39 40 41 42 43 44 45 46 47 48 49 50 51 52 53 54 55 56 57 58 59 60 61 62 63 64 65 66 67 68 69 70 71 72 73 74 75 76 77 78 79 80 81 82 83 84 85 86 87 88 89 90 91 92 93 94 95 96 97 98 99 100 101 102 103 |
package first.robot.mechanisms; import java.util.Set; import java.util.function.DoubleSupplier; import org.wpilib.command3.Command; import org.wpilib.command3.Coroutine; import org.wpilib.command3.Mechanism; import org.wpilib.command3.StagedCommandBuilder; import org.wpilib.units.Units; import robotCore.Encoder; import robotCore.Encoder.EncoderType; import robotCore.Logger; import robotCore.Minibot; import robotCore.PWMMotor; public class DriveMechanism implements Mechanism { private PWMMotor m_leftMotor = new PWMMotor(Minibot.LeftMotorPWM, Minibot.LeftMotorDir); private PWMMotor m_rightMotor = new PWMMotor(Minibot.RightMotorPWM, Minibot.RightMotorDir); private Encoder m_leftEncoder = new Encoder(EncoderType.Quadrature, Minibot.LeftEncoderInt, Minibot.LeftEncoderDir); private Encoder m_rightEncoder = new Encoder(EncoderType.Quadrature, Minibot.RightEncoderInt, Minibot.RightEncoderDir); public DriveMechanism() { Logger.log("DriveMechanism", 1, "DriveMechanism()"); m_rightEncoder.setInverted(true); } public void setPower(double leftPower, double rightPower) { m_rightMotor.set(rightPower); m_leftMotor.set(leftPower); } public void stop() { setPower(0, 0); } public Command driveForTime(double power, double time) { return new Command() { @Override public void run(Coroutine coroutine) { Logger.log("DriveForTime", 1, "starts"); setPower(power, power); coroutine.wait(Units.Seconds.of(time)); stop(); Logger.log("DriveForTime", 1, "ends"); } @Override public String name() { return "DriveForTime"; } @Override public Set<Mechanism> requirements() { return Set.of(DriveMechanism.this); } @Override public void onCancel() { stop(); } }; } public Command arcadeDrive(DoubleSupplier xSupplier, DoubleSupplier ySupplier) { return new Command() { @Override public void run(Coroutine coroutine) { while (true) { double y = ySupplier.getAsDouble(); double x = xSupplier.getAsDouble(); x = x * x * Math.signum(x); y = y * y * Math.signum(y); setPower(y + x, y - x); coroutine.yield(); } } @Override public String name() { return "ArcadeDrive"; } @Override public Set<Mechanism> requirements() { return Set.of(DriveMechanism.this); } @Override public void onCancel() { stop(); } }; } } |
Now it is time to create our new command which we will call DriveForDistance command. As you did before create a new function in DriveMechanism.java called driveForDistance() function that takes a power and distance as arguments and returns a new Command() and fill in all the missing functions as before, leaving the run() function to fix. Your driveForDistance() function should look like:
|
1 2 3 4 5 6 7 8 9 10 11 12 13 14 15 16 17 18 19 20 21 22 23 24 25 |
public Command driveForDistance(double power, double distance) { return new Command() { @Override public void run(Coroutine coroutine) { // TODO Auto-generated method stub throw new UnsupportedOperationException("Unimplemented method 'run'"); } @Override public String name() { return "DriveForDistance"; } @Override public Set<Mechanism> requirements() { return Set.of(DriveMechanism.this); } @Override public void onCancel() { stop(); } }; } |
Now we need to do the following in the run() function:
- Reset the encoder to zero by calling the encoder’s reset() function
- Turn the motors on by calling setPower()
- Loop until the current encoder value obtained by a call the encoder’s get() function reaches the distance.
- Turn the motors off by calling stop()
Take a shot of creating this code yourself. When you are done, your run() function should look something like:
|
1 2 3 4 5 6 7 8 9 10 11 12 |
public void run(Coroutine coroutine) { m_leftEncoder.reset();; m_rightEncoder.reset(); setPower(power, power); while (m_leftEncoder.get() < distance) { coroutine.yield(); } stop(); } |
Don’t forget the yeild() in your loop!
We now need configure joystick button 2 (index 1) so when it is pressed we will run the DriveForDistance command. Add one line to TeleopOpMode constructor:
|
1 2 3 4 5 6 7 8 9 10 |
public TeleopOpMode(Robot robot) { Logger.log("TeleopOpMode", 1, "TeleopOpMode()"); robot.m_driveMechanism.setDefaultCommand(robot.m_driveMechanism.arcadeDrive( () -> robot.m_cmdJoystick.getX(), () -> robot.m_cmdJoystick.getY())); robot.m_cmdJoystick.getHID().button(0).onTrue(robot.m_driveMechanism.driveForTime(0.75, 2)); robot.m_cmdJoystick.getHID().button(1).onTrue(robot.m_driveMechanism.driveForDistance(0.75, 1000)); } |
Note that the distance that we are passing in are in somewhat arbitrary units. The Encoder counts are somewhat arbitrary as they depend on the particular motor/encoder and the size of the wheel. We have chosen 2000 here just to test this command. Later we will perform a conversion which will allow us to use real world units such as inches.
Now run your program and click the B2 button. You should find that your robot will drive a short distance and then stop. Also note that since we are now using distance rather than time, we can change the speed and the robot should still move the same distance. Try it out and see.