Now that we know how to create commands, let’s do something a little more useful. In this chapter we are going to create a command which will allow us to control the drive motors using a joystick.
Like we did for the driveForTime command we will create this command in our DriveMechanism.java file by adding the following function:
|
1 2 3 4 5 6 |
public Command arcadeDrive() { return new Command() { }; } |
As before you should use the “Quick Fix” option to “Add unimplemented methods“. Then return the name “ArcadeDrive” for the name() and return this Mechanism for the requirements(). Also add the function onCancle() and have it stop the robot. For now, leave the run() function unchanged. Your arcadeDrive() function should now look like:
|
1 2 3 4 5 6 7 8 9 10 11 12 13 14 15 16 17 18 19 20 21 22 23 24 |
public Command arcadeDrive() { return new Command() { @Override public void run(Coroutine coroutine) { // TODO Auto-generated method stub throw new UnsupportedOperationException("Unimplemented method 'run'"); } @Override public String name() { return "ArcadeDrive"; } @Override public Set<Mechanism> requirements() { return Set.of(DriveMechanism.this); } @Override public void onCancel() { stop(); } }; |
Now, what we want to do is to use the Joystick to control the two motors that will let us drive the robot arcade style. To do this, we are going to need access to the joystick. We could just pass in the entire Joystick class so that we have access but this would require our command to have knowledge about the type of joystick we are using and if we decided to switch to a Gamepad we would need to change our function. Instead we are going to only pass in two functions that will allow us to read the current X and Y values from the Joystick. To get access to these functions we will change the declaration of our function as follows:
|
1 2 |
public Command arcadeDrive(DoubleSupplier xSupplier, DoubleSupplier ySupplier) { .... |
Now we are ready to implement the run() function. What we want to do is to create an infinite loop where we will read the current values from the joystick and set the motor power accordingly. So for the run() function we are going to want to do something like:
|
1 2 3 4 5 6 7 |
public void run(Coroutine coroutine) { while (true) { // Read Joystick // Set motor power } } |
Now there is one very important thing that is missing here. The system is designed so that multiple commands can run simultaneously and if we create an infinite loop like this run() will never return and this will hang your entire robot. What we need to do is to provide a way for other things to run while we are in this loop. They way to do this is to call the function coroutine.yeild() from withing the loop as follows:
|
1 2 3 4 5 6 7 8 9 |
@Override public void run(Coroutine coroutine) { while (true) { // Read Joystick // Set motor power coroutine.yield(); } } |
Now, each time through the loop, we yield control and allow other commands to run. Looking at this code you might be thinking “Isn’t this still an infinite loop? How does this command ever end?“. Yes, it appears to be an infinite loop but calling the yield() function not only allows other commands to run but it also allows this command to be canceled and, if it is cancelled, the onCancel() function will be called.
Anytime you have a loop in your code you need to have it yield (unless it is a very small and fast loop). One important thing to note is each time you yield, your code will not get another chance to run for 20ms.
Now we are ready to start controlling our robot. Let’s start by just reading the Y value from the joystick and make the robot drive forward and backwards using this value. We can get the Y position of the joystick by calling ySupplier.getAsDouble() and the joystick will return number from -1.0 to +1.0. Since the motors take their power setting in the same range, we can simply pass this on to the setPower(…) function our DriveMechanism. The run() function of your arcadeDrive(…) should now look like:
|
1 2 3 4 5 6 7 8 9 |
public void run(Coroutine coroutine) { while (true) { double y = ySupplier.getAsDouble(); setPower(y, y); coroutine.yield(); } } |
And your entire arcadeDrive(…) function should now look like:
|
1 2 3 4 5 6 7 8 9 10 11 12 13 14 15 16 17 18 19 20 21 22 23 24 25 26 27 28 29 30 |
public Command arcadeDrive(DoubleSupplier xSupplier, DoubleSupplier ySupplier) { return new Command() { @Override public void run(Coroutine coroutine) { while (true) { double y = ySupplier.getAsDouble(); setPower(y, y); coroutine.yield(); } } @Override public String name() { return "ArcadeDrive"; } @Override public Set<Mechanism> requirements() { return Set.of(DriveMechanism.this); } @Override public void onCancel() { stop(); } }; } |
To have the robot respond to joystick input, we don’t want to connect this command to a button like we did with the DriveForTimeCommand. We want this command to always run – to always look for input from the Joystick – whenever no other command that requires the DriveMechanism is running. To do this we add a setDefaultCommand(…) call to the constructor of our TeleopOpCode class as follows:
|
1 2 3 |
robot.m_driveMechanism.setDefaultCommand(robot.m_driveMechanism.arcadeDrive( () -> robot.m_cmdJoystick.getX(), () -> robot.m_cmdJoystick.getY())); |
The odd looking code:
|
1 |
() -> robot.m_cmdJoystick.getX() |
is just a way for us to pass the getX() joystick function to our command. We need to pass the function itself, not just the current value, because the ArcadeDrive command will needs to be able to repeatedly call it to get the current value. This is called a lambda expression and you will be using it a lot when programming your robots.
Your TeleopOpCode.java file should now look like:
|
1 2 3 4 5 6 7 8 9 10 11 12 13 14 15 16 17 18 19 20 21 22 23 24 25 26 27 28 29 30 31 32 33 |
// Copyright (c) FIRST and other WPILib contributors. // Open Source Software; you can modify and/or share it under the terms of // the WPILib BSD license file in the root directory of this project. package first.robot; import org.wpilib.opmode.OpMode; import org.wpilib.opmode.Teleop; import robotCore.Logger; @Teleop public class TeleopOpMode implements OpMode { public TeleopOpMode(Robot robot) { Logger.log("TeleopOpMode", 1, "TeleopOpMode()"); robot.m_driveMechanism.setDefaultCommand(robot.m_driveMechanism.arcadeDrive( () -> robot.m_cmdJoystick.getX(), () -> robot.m_cmdJoystick.getY())); robot.m_cmdJoystick.getHID().button(0).onTrue(robot.m_driveMechanism.driveForTime(0.75, 2)); } @Override public void start() { Logger.log("TeleopOpMode", 2, "start()"); } @Override public void periodic() { } } |
Now run your program and you should be able to use the joystick to move the robot forward and backwards.
Of course, we are going to want to be able to turn our robot. How are we going to do that? To make the robot turn right, we want to run the left motor forward and the right motor backwards. To turn left we need to do the opposite. If we are going to use the X value from the joystick, we might accomplish this by changing the run() function of our ArcadeDrive as follows:
|
1 2 3 4 5 6 7 8 9 10 |
public void run(Coroutine coroutine) { while (true) { double y = ySupplier.getAsDouble(); double x = xSupplier.getAsDouble(); setPower(x, -x); coroutine.yield(); } } |
Now this will enable the robot to turn, but it will no longer drive forward and backward. See if you can figure out how to change the run() function to accomplish both driving forward and backward and turning. When you have your solution, compare it to the one below:
Don’t scroll down until you have tried to find your own solution!
.
.
.
|
1 2 3 4 5 6 7 8 9 10 |
public void run(Coroutine coroutine) { while (true) { double y = ySupplier.getAsDouble(); double x = xSupplier.getAsDouble(); setPower(y + x, y - x); coroutine.yield(); } } |
You might find that controlling the robot, especially at low speeds is a bit tricky. There is a simple way that we can improve it. Right now if we were to graph the power we apply to the motors vs the X or Y of the joystick, we would just see a straight line. What we would like to do is curve the relationship so that we have more control over the lower speeds. We can do this by cubing the X and Y values. Compare the linear (red) and cubic (blue) curves:
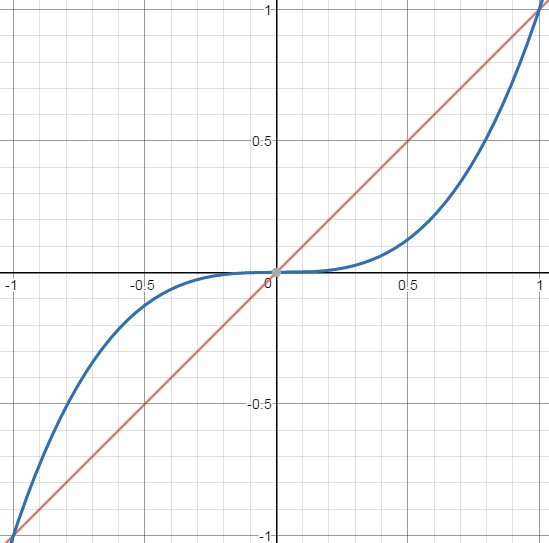
Notice that in both cases, we can still get full power out of the robot by pushing the joystick full over in one direction or another (this is because 1.0 * 1.0 * 1.0 is still equal to 1.0). However for joystick positions less than 1.0, we see that the power output increases much more slowly than the linear case, allowing for better control at the lower speeds. We can implement this change in our run() function as follows:
|
1 2 3 4 5 6 7 8 9 10 11 12 13 |
public void run(Coroutine coroutine) { while (true) { double y = ySupplier.getAsDouble(); double x = xSupplier.getAsDouble(); x = x * x * x; y = y * y * y; setPower(y + x, y - x); coroutine.yield(); } } |
Try it out and see if you don’t have better control over the robot.
Note that we could also just square the inputs which would result in a less drastic flattening of the curve. However if we wanted to use the square, we would need to take care to make sure that the sign was correct when X or Y becomes negative (remember that -1.0 * -1.0 is equal to +1.0). As an exercise, why don’t you see if you can come up with a solution that squares the inputs but still preserves the sign. You can then compare your solution to the one below:
.
.
.
.
|
1 2 3 4 5 6 7 8 9 10 11 12 13 14 15 16 17 18 19 20 21 22 |
public void run(Coroutine coroutine) { while (true) { double y = ySupplier.getAsDouble(); double x = xSupplier.getAsDouble(); if (x < 0) { x = -x * x; } else { x = x * x; } if (y < 0) { y = -y * y; } else { y = y * y; } setPower(y + x, y - x); coroutine.yield(); } } |
As a final note, there are other ways this may be accomplished such as using the Math.abs function which returns the absolute value of a number.
|
1 2 3 4 5 6 7 8 9 10 11 12 13 |
public void run(Coroutine coroutine) { while (true) { double y = ySupplier.getAsDouble(); double x = xSupplier.getAsDouble(); x = Math.abs(x) * x; y = Math.abs(y) * y; setPower(y + x, y - x); coroutine.yield(); } } |
By taking the absolute value and multiplying it by itself, we square the value but retain the sign. While this involves less typing it may or may be less intuitive.
Finally you can also do this using the Math.signum function which returns +1 if the number is positive and -1 if the number is negative.
|
1 2 3 4 5 6 7 8 9 10 11 12 13 |
public void run(Coroutine coroutine) { while (true) { double y = ySupplier.getAsDouble(); double x = xSupplier.getAsDouble(); x = x * x * Math.signum(x); y = y * y * Math.signum(y); setPower(y + x, y - x); coroutine.yield(); } } |
These show that there are many correct ways to solve a problem given the tools Java provides…and in general!