In the last chapter we learned how to run our program, but it really didn’t do anything other than print logging information. That is because we have not told it to do anything yet. In this chapter we will create code which can be used to control the two drive motors.
To do this we will create a Mechanism. Mechanisms are designed to control some aspect of the robot, in this case the drive motors. We are going to need to be able to control the motors using a number of different commands. Using a Mechanism lets us control what commands are allowed to access the motors, and when.”
To create a new Mechanism, right click on mechanisms in the Explorer list on the left and choose the Class option from the New Java File menu as shown below.
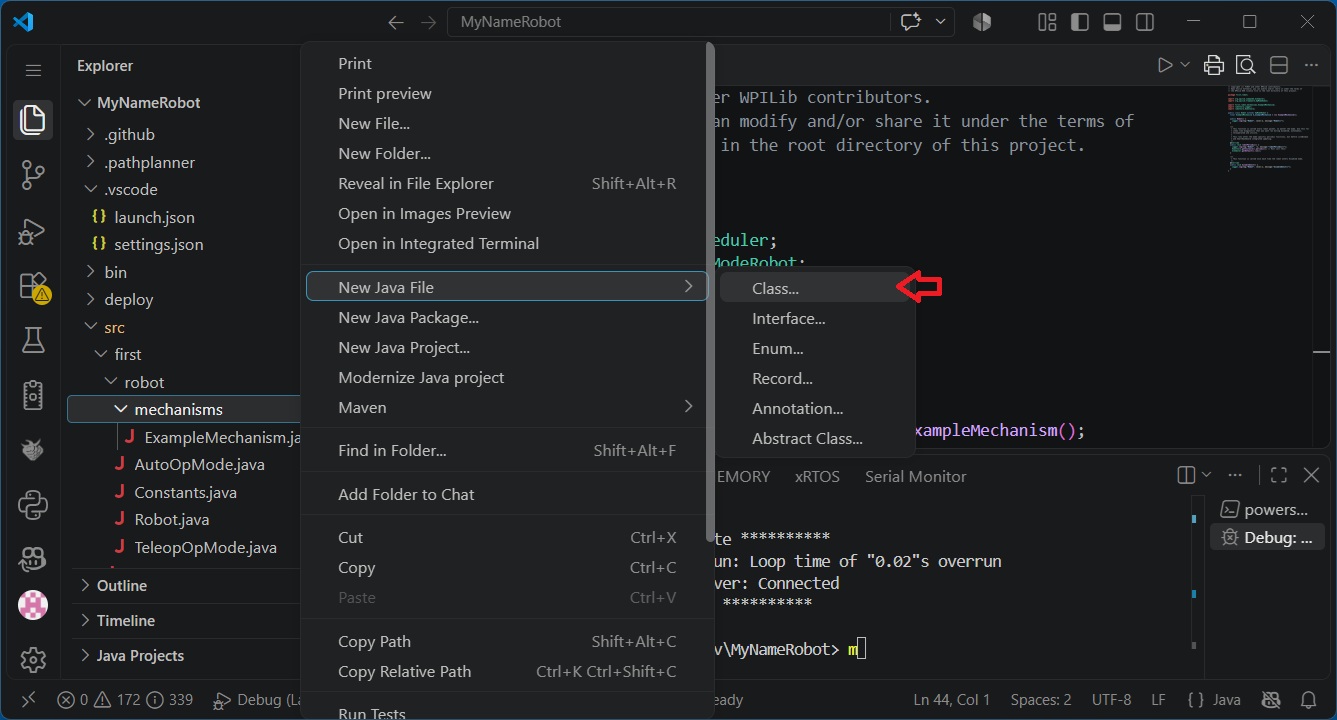
Then enter the name DriveMechanism in the box at the top as shown and press Enter.
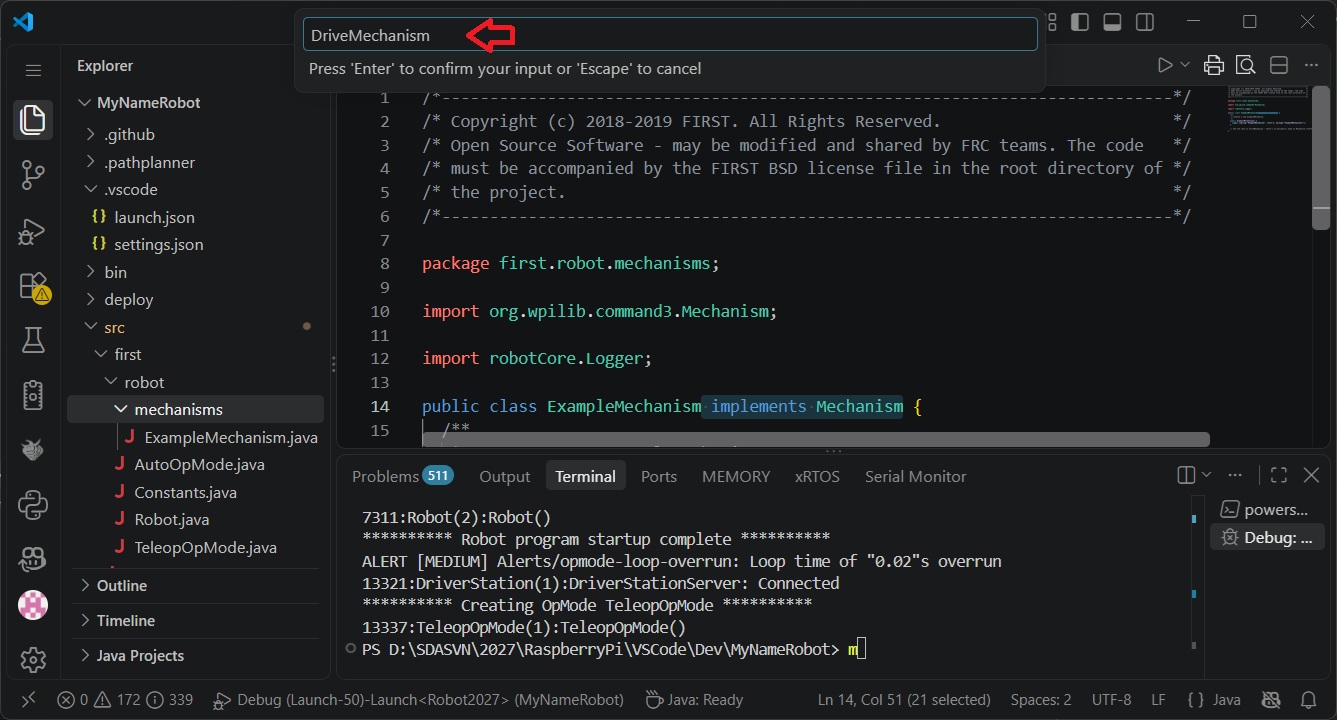
This will create a new file called DriveMechanism.java with the following code:
|
1 2 3 4 5 6 |
package first.robot.mechanisms; public class DriveMechanism { } |
Now change the declaration to make DriveMechanism implement Mechanism and create a constructor which will log the creation. Your DriveMechanism.java file should now look like:
|
1 2 3 4 5 6 7 8 9 10 11 |
package first.robot.mechanisms; import org.wpilib.command3.Mechanism; public class DriveMechanism implements Mechanism { public DriveMechanism() { Logger.log("DriveMechanism", 1, "DriveMechanism()"); } } |
Now you will notice that Logger is underlined in red. This indicates that there is an error. If you hover over the work Logger, it will show you the error:
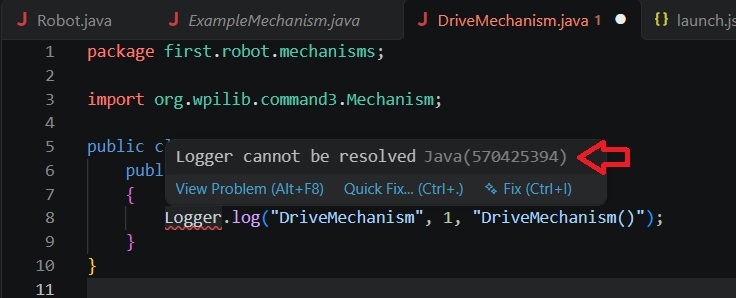
This is telling you the Logger has not been defined. What you need to do is import the correct package. The easiest way to do this is to click on the Quick Fix shown above and choose the Import ‘Logger’ (robotCore) option shown below. Make sure you choose the robotCore version.
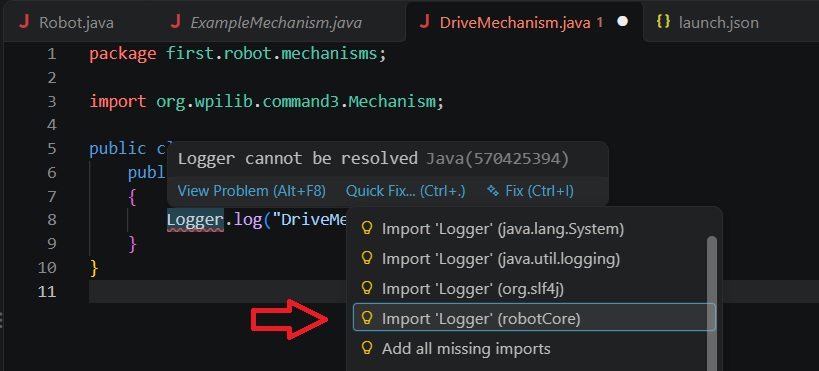
Once you have done this your DriveMechanism.java file should look like the following and no longer contain any errors.
|
1 2 3 4 5 6 7 8 9 10 11 12 13 |
package first.robot.mechanisms; import org.wpilib.command3.Mechanism; import robotCore.Logger; public class DriveMechanism implements Mechanism { public DriveMechanism() { Logger.log("DriveMechanism", 1, "DriveMechanism()"); } } |
Adding Code to DriveMechanism
If we are going to drive, we need motors and need to control them in software. RobotCore includes a class for motor control called PWMMotor. To use this, we will:
- Create variables to hold the PWMMotor objects (one for each motor, left and right)
- Use these to import the correct library
- Define some variables needed to initialize the PWMMotor objects
- Create the motor objects with ‘new’
The first thing we must do, then, is to create the variables that will be used to control these motors. Add the following two lines to the top of your DriveMechanism class (not the top of the file!):
|
1 2 |
private PWMMotor m_leftMotor; private PWMMotor m_rightMotor; |
You should note that we are prepending the variable names with an ‘m_‘ to identify them as member variables of our class. Later you will see that we also use the prefix ‘k_‘ to identify constants.
You may also note that PWMMotor is underlined in red, if so you need to import the proper package like you did with Logger above.
We now see that the variable names (e.g. m_leftMotor) are now underlined in yellow. The yellow underline represents a warning and while warnings will not prevent your program from running they do point to possible problems that may need to be fixed. In this case if we hover over the warning we will see the message ‘The value of the field DriveMechanism.m_leftMotor is not used’. This is ok at this time since we will be adding code which will use these fields and the warning will go away. In general, you should try and eliminate all warnings from your program. If you have a warning that you know that you want to ignore you can make it go away using the @SuppressWarnings directive. You should, of course, only suppress warnings that you know for a fact are not going to cause problems.
We have declared the variables to control the motors, but we still need to initialize them. Looking at the documentation for PWMMotor we see the constructor requires 2 integers, a pwmPin and a dirPin. The first pin will control the power of the motor and the second will control the direction. We are using a microcontroller to provide these signals and only some of the pins can be configured for PWM (Pulse Width Modulation) output. We have predefined constants which specify these values for the left and right motors that can be found in the Minibot class. Given this, we can call the PWMMotor() constructor to instantiate our PWMMotor objects, and initialize our motor variables with these constants:
|
1 2 |
private PWMMotor m_leftMotor = new PWMMotor(Minibot.LeftMotorPWM, Minibot.LeftMotorDir); private PWMMotor m_rightMotor = new PWMMotor(Minibot.RightMotorPWM, Minibot.RightMotorDir); |
You will, of course, also need to import Minibot from RobotCore;
|
1 |
import robotCore.Minibot; |
Now that we have defined and initialized the variables that control the motors we need to provide a function that will allow users of this class the ability to set the power on the motors. We will create a function called setPower which will allow us to set the power of the left and right motors. Once again consulting the documentation for PWMMotor we find that we can set the power on an individual motor by calling its set(double power) function. This function takes a single argument which specifies the power and can range from -1.0 for full reverse to +1.0 for full forward. Given this we will define our setPower function as follows.
Because Constructors come before methods in a class, setPower() goes after DriveMechanism(), but can come before periodic().
|
1 2 3 4 |
public void setPower(double leftPower, double rightPower) { m_rightMotor.set(rightPower); m_leftMotor.set(leftPower); } |
Note that there will be many cases where you will want to stop the motor. You can, of course, call setPower(0, 0) but you should also create a function called stop() which will do that:
|
1 2 3 |
public void stop() { setPower(0, 0); } |
Your DriveMechanism.java file should now look like:
|
1 2 3 4 5 6 7 8 9 10 11 12 13 14 15 16 17 18 19 20 21 22 23 24 25 26 |
package first.robot.mechanisms; import org.wpilib.command3.Mechanism; import robotCore.Logger; import robotCore.Minibot; import robotCore.PWMMotor; public class DriveMechanism implements Mechanism { private PWMMotor m_leftMotor = new PWMMotor(Minibot.LeftMotorPWM, Minibot.LeftMotorDir); private PWMMotor m_rightMotor = new PWMMotor(Minibot.RightMotorPWM, Minibot.RightMotorDir); public DriveMechanism() { Logger.log("DriveMechanism", 1, "DriveMechanism()"); } public void setPower(double leftPower, double rightPower) { m_rightMotor.set(rightPower); m_leftMotor.set(leftPower); } public void stop() { setPower(0, 0); } } |